
AC units must be workhorses in Florida to handle year-round heat and humidity. Keeping your AC clean is one way to prevent failure and avoid costly repairs. Unsurprisingly, though, your AC unit is prone to mold growth due to the excessive moisture in our air, and mold is more likely to grow if you turn off your AC for a few days. While it sounds like a scary problem and is a health risk, removing mold from your air conditioner is simple.
Call David Gray at (904) 605-8190 to learn more about cleaning mold from your Florida home’s AC.
Signs You Have Mold Growing in Your AC Unit
Florida’s humid air provides the perfect breeding ground for mold. Fortunately, it's highly improbable that it's black mold. Even though it isn't the plague, it still has to go. Some things to watch out for if you suspect mold contamination in your AC include:
- Musty or moldy odor
- You or your family members are experiencing allergy-like symptoms
- Reduced airflow coming from AC
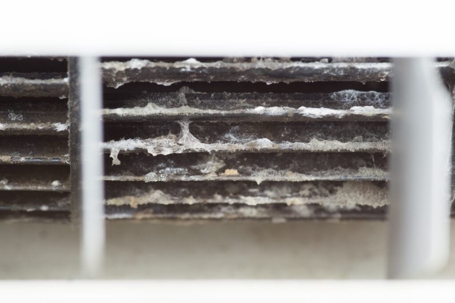
- Visible mold growth, which isn't always easy to see but can appear black, green, or white, and it may have a fuzzy or slimy texture
- Excessive moisture around your AC unit or near air vents
- Dirty or clogged filters
Now that you've confirmed the presence of mold, it's time to get rid of it. Use our step-by-step instructions for each AC unit in your home, and you'll be breathing cleaner again in no time.
Getting Started: Removing Visible Mold From Your Air Conditioner
First, gather your supplies. Here's what you need to clean mold out of your AC unit:
- Screwdriver
- Wet/dry vacuum with a nozzle attachment
- Commercial AC coil cleaner
- Garden hose
- Dish soap
- Bleach
- Large plastic bucket
- Scrubbing sponge
- Cleaning gloves
- Cloth or disposable face mask
While it depends on the amount of mold you need to remove, cleaning your AC unit should take about an hour from start to finish.
Schedule Your Service TodayStep 1: Turn Off the Power and Unplug the AC Unit
To ensure your safety, turn off the power to the AC unit at the circuit breaker and unplug it from the electrical outlet. This will prevent any electrical hazards while working on the unit.
Step 2: Remove the AC Unit's Cover
Using a screwdriver, carefully remove the cover of your AC unit. This will expose the internal components, including the cooling coils, fan, and filter. Keep track of any screws or fasteners you remove during this process.
Step 3: Inspect and Clean the Filter
Remove the filter from the AC unit and inspect it for mold. If it's covered in mold, replace it with a new one. If the mold is minimal, clean the filter using a mild detergent or mold-removing cleaning solution, then rinse it thoroughly and allow it to dry completely before reinstalling it.
Step 4: Vacuum and Clean the Cooling Coils
Using your vacuum cleaner's brush attachment, gently vacuum the cooling coils to remove dirt, dust, and mold. Be careful not to damage the delicate fins. After vacuuming, mix your cleaning solution with water in a spray bottle and spray the coils. Let the solution sit for a few minutes, then use a soft brush to gently scrub away any remaining mold. Rinse the coils with clean water and let them dry.
Step 5: Clean the Fan and Other Internal Components
Next, clean the fan and any other internal components that may have mold on them. Use the vacuum cleaner to remove loose debris, then spray the parts with your cleaning solution. Allow the solution to sit briefly before scrubbing with a soft brush. Rinse with clean water and let everything dry.
Step 6: Reassemble and Test the AC Unit
Once all components are clean and dry, reassemble your AC unit by replacing the cover and securing it with the screws or fasteners you removed earlier. Plug the unit back in, turn the power back on at the circuit breaker, and test the unit to ensure it functions properly.
Step 7: Prevent Future Mold Growth
To minimize the risk of mold returning, perform regular maintenance on your AC unit, including cleaning or replacing the filter, checking for proper drainage, and inspecting for any signs of mold growth. Consider using a dehumidifier to reduce humidity levels and discourage mold growth.
If mold contamination is too insidious for your DIY comfort level, call David Gray at (904) 605-8190 and we'll gladly handle it.
Trust David Gray for AC Maintenance & Repairs
Keeping your AC unit clean and mold-free ensures a comfortable and healthy living environment. By following the preventive measures mentioned above, you can minimize the risk of mold growth in your AC system. However, if you need professional AC maintenance, repair, or mold removal assistance, David Gray Heating & Air is here to help. Our expert technicians are trained to handle all air conditioning issues and can provide thorough cleaning and inspection services to keep your AC running at its best.
Don't wait until mold becomes a problem! Contact David Gray Heating & Air at (904) 605-8190 to schedule AC maintenance and repair services and experience peace of mind with a well-maintained system.